前一篇文章总结了我对OpenGL引擎的总体工作流程的理解。接下来就开始使用OpenGL渲染引擎来实现一些图形图像的渲染展示。OpenGL是一个多平台的框架,而我们知道不同平台有自己不同的屏幕渲染实现,那么,它是如何和各个系统结合起来的呢?
OpenGL通过EGL(Embedded Graphics Library)在本地窗口系统之间定义了一套中间接口层,具体由各个厂商实现。
EGL提供如下机制:
- 与设备的原生窗口系统通信
- 查询绘图表面的可用类型和配置
- 创建绘图表面
- 在OpenGL ES和其他图形渲染API之间同步渲染
- 管理纹理贴图等渲染资源
在iOS中通过EAGL将OpenGL和UIKit链接起来,同时还封装了一套GLKit用于OpenGL绘制操作。话说回来,虽然在iOS12之后Apple将废弃OpenGL改用自家的Metal,但是图形编程的一些概念(渲染管线,着色器)还是差不多的,所以从OpenGL迁移到Metal成本相对低点。
iOS中EAGL的构成

在Android中通过SurfaceView将OpenGL链接到UI层框架里面。
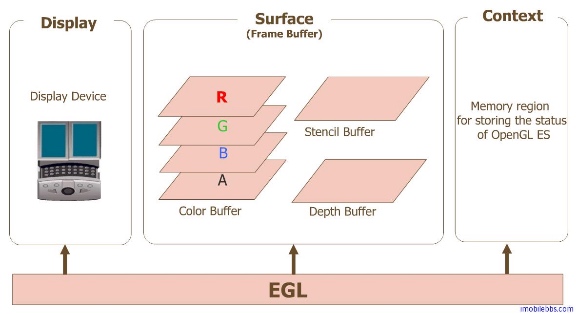
EGL链接OpenGL和本地UI框架
EGL可以看做是各个厂商实现的一套OpenGL运行环境中间层接口,它将OpenGL和本地UI框架联系起来。
我所了解到的在iOS,Andorid中编写OpenGL程序的方式主要以下几种:
- 链接EGL到UIView中(iOS)
- 使用GLKit(iOS)
- 链接EGL到SurfaceView(Android)
- GLSurfaceView(Android)
那么在此,我将尝试实现上述四种解决方案来构建OpenGL的渲染环境。
Apple OpenGLES文档
Andoird OpenGLES文档
阅读文档是个好习惯,如何在iOS和Android中使用OpenGL引擎文档中都有介绍。下面我将根据我的理解来搭建一个简单OpenGL渲染视图。
Demo工程:OpenGL学习实例
基于EAGL的UIView
打开iOS上的OpenGL框架中EAGL.h文件。1
2
3
4
5
6
7
8
9
10
11
12
13
14
15
16
17
18
19
20
21
22
23
24
25
26
27/* EAGL rendering API */
typedef NS_ENUM(NSUInteger, EAGLRenderingAPI)
{
kEAGLRenderingAPIOpenGLES1 = 1,
kEAGLRenderingAPIOpenGLES2 = 2,
kEAGLRenderingAPIOpenGLES3 = 3,
};
@interface EAGLContext : NSObject
{
@public
struct _EAGLContextPrivate *_private;
}
- (nullable instancetype) init NS_UNAVAILABLE;
- (nullable instancetype) initWithAPI:(EAGLRenderingAPI) api;
- (nullable instancetype) initWithAPI:(EAGLRenderingAPI) api sharegroup:(EAGLSharegroup*) sharegroup NS_DESIGNATED_INITIALIZER;
+ (BOOL) setCurrentContext:(nullable EAGLContext*) context;
+ (nullable EAGLContext*) currentContext;
@property (readonly) EAGLRenderingAPI API;
@property (nonnull, readonly) EAGLSharegroup* sharegroup;
@property (nullable, copy, nonatomic) NSString* debugLabel NS_AVAILABLE_IOS(6_0);
@property (getter=isMultiThreaded, nonatomic) BOOL multiThreaded NS_AVAILABLE_IOS(7_1);
@end
可以看到这个文件的封装非常简单,提供了支持的OpenGL API等级和OpenGL Context(这里记得吧,OpenGL是一个状态机,所以这里抽象出OpenGL的执行环境作为外部接口,意味着在iOS上OpenGL的执行代码都是运行在这些Context中的)。
OpenGL部分的接口有了,那么UIKit的呢?怎么将它们联系起来呢?首先,我们知道UIView中的渲染功能实际上是由CAlayer来完成的,然后再查一下文档发现有一个CALayer叫CAEAGLLayer。也就意味着UIKit中和OpenGL对接的部分就是通过这个Layer来完成的。
一边是EAGLContext,一边是CAEAGLLayer。OpenGL和UIView的接口都有了,那么具体如何将它们联系在一起呢?
仔细看一下CAEAGLLayer.h这个文件,可以发现这个Layer遵循一个叫EAGLDrawable的协议。意味着这个Layer将通过EAGLDrawable中的方法将OpenGL和Layer联系在一起,简单的说这个Layer内部实现了EAGLDrawable的方法实现利用OpenGL引擎来渲染图形图像。而我们只需要向CAEAGLLayer喂渲染数据就行了。(这里EGL就实现了,接口相当简洁吧!)1
2
3
4
5
6
7
8
9
10
11
12
13
14
15
16
17@interface CAEAGLLayer : CALayer <EAGLDrawable>
{
@private
struct _CAEAGLNativeWindow *_win;
}
/* When false (the default value) changes to the layer's render buffer
* appear on-screen asynchronously to normal layer updates. When true,
* changes to the GLES content are sent to the screen via the standard
* CATransaction mechanisms. */
@property BOOL presentsWithTransaction CA_AVAILABLE_IOS_STARTING (9.0, 9.0, 2.0);
/* Note: the default value of the `opaque' property in this class is true,
* not false as in CALayer. */
@end
打开EAGLDrawable.h这个文件,发现它定义的方法列表页很简单,可以看到它的每个函数名都跟Renderbuffer相关。1
2
3
4
5
6
7
8
9
10
11
12
13
14
15
16
17
18
19
20
21@protocol EAGLDrawable
/* Contains keys from kEAGLDrawableProperty* above */
@property(nullable, copy) NSDictionary<NSString*, id>* drawableProperties;
@end
/* Extends EAGLContext interface */
@interface EAGLContext (EAGLContextDrawableAdditions)
/* Attaches an EAGLDrawable as storage for the OpenGL ES renderbuffer object bound to <target> */
- (BOOL)renderbufferStorage:(NSUInteger)target fromDrawable:(nullable id<EAGLDrawable>)drawable;
/* Request the native window system display the OpenGL ES renderbuffer bound to <target> */
- (BOOL)presentRenderbuffer:(NSUInteger)target;
/* Request the native window system display the OpenGL ES renderbuffer bound to <target> at specified time */
- (BOOL)presentRenderbuffer:(NSUInteger)target atTime:(CFTimeInterval)presentationTime;
/* Request the native window system display the OpenGL ES renderbuffer bound to <target> after the previous frame is presented for at least duration time */
- (BOOL)presentRenderbuffer:(NSUInteger)target afterMinimumDuration:(CFTimeInterval)duration;
回忆一下,OpenGL的引擎的渲染流程是咋样的呢?从外部输入顶点数据一直到将处理完毕的渲染数据传递到Renderbuffer(渲染缓存帧)的过程。也就是OpenGL执行链的尾端是渲染缓存帧,刚好,EAGLDrawable这个协议规定了一个函数:
- (BOOL)renderbufferStorage:(NSUInteger)target fromDrawable:(nullable id<EAGLDrawable>)drawable;
意味着我们通过这个协议方法将渲染数据传递到这个Layer的Renderbuffer上整个流程的逻辑链就完整了。
接下来开始实践一下:
Renderbuffer显示区域的大小是在绑定的时候就确定的,如果想变更大小只有重新创建绑定一遍。所以当UIView在layoutSubviews的时候要检查一下frame大小是否改变了,并重新绑定Renderbuffer。1
2
3
4
5
6
7
8
9
10// Layout的时候重新适配一个Renderbuffer
- (void)layoutSubviews {
[super layoutSubviews];
CGSize size = self.frame.size;
if (CGSizeEqualToSize(self.oldSize, CGSizeZero) || !CGSizeEqualToSize(_oldSize, size)) {
[self linkOpenGLBuffer];
self.oldSize = size;
}
}
接下来就是framebuffer<->GL_FRAMEBUFFER<->GL_RENDERBUFFER<->renderbuffer的绑定流程:1
2
3
4
5
6
7
8
9
10
11
12
13
14
15
16
17
18
19
20
21
22
23
24
25
26
27
28
29
30
31
32
33
34
35
36
37
38
39
40
41
42
43- (void)linkOpenGLBuffer {
// 用于显示的layer
self.eaglLayer = (CAEAGLLayer *)self.layer;
// CALayer默认是透明的,而透明的层对性能负荷很大。所以将其关闭。
self.eaglLayer.opaque = YES;
// 释放旧的renderbuffer
if (_renderbuffer) {
glDeleteRenderbuffers(1, &_renderbuffer);
_renderbuffer = 0;
}
// 释放旧的framebuffer
if (_framebuffer) {
glDeleteFramebuffers(1, &_framebuffer);
_framebuffer = 0;
}
// 生成renderbuffer
glGenRenderbuffers(1, &_renderbuffer);
// 绑定_renderbuffer到当前OpenGL Context的GL_RENDERBUFFER中
glBindRenderbuffer(GL_RENDERBUFFER, _renderbuffer);
// 绑定_renderbuffer到eaglLayer上
[_eaglContext renderbufferStorage:GL_RENDERBUFFER fromDrawable:_eaglLayer];
// 生成framebuffer(之后OpenGL的数据均传递到这个framebuffer中)
glGenFramebuffers(1, &_framebuffer);
// 绑定_framebuffer到当前OpenGL Context的GL_FRAMEBUFFER中
glBindFramebuffer(GL_FRAMEBUFFER, _framebuffer);
// 绑定当前OpenGL Context的GL_FRAMEBUFFER和GL_RENDERBUFFER
glFramebufferRenderbuffer(GL_FRAMEBUFFER, GL_COLOR_ATTACHMENT0, GL_RENDERBUFFER, _renderbuffer);
// 在此完成_framebuffer<--->GL_FRAMEBUFFER<--->GL_RENDERBUFFER<--->_renderbuffer的绑定
// 检查framebuffer是否创建成功
NSError *error;
NSAssert1([self checkFramebuffer:&error], @"%@",error.userInfo[@"ErrorMessage"]);
}
那么我们现在我们已经将fbo和rbo以及Layer串起来了。之后要做的事便是向fbo提供数据了1
2
3
4
5
6
7
8
9
10
11
12
13
14
15
16
17- (void)drawSampleToFramebuffer {
// 保证是在当前Context中
if ([EAGLContext currentContext] != _eaglContext) {
[EAGLContext setCurrentContext:_eaglContext];
}
// 保证GL_RENDERBUFFER和GL_FRAMEBUFFER绑定的对象是正确的
glBindRenderbuffer(GL_RENDERBUFFER, _renderbuffer);
glBindFramebuffer(GL_FRAMEBUFFER, _framebuffer);
// 给framebuffer画上背景色(最简单的fbo操作)
glClearColor(0, 0, 0, 0);
glClear(GL_COLOR_BUFFER_BIT);
// 告知eaglContext可以renderbuffer
[self.eaglContext presentRenderbuffer:GL_RENDERBUFFER];
}
这里主要是介绍在iOS中如何将OpenGL和UIKit结合起来。而我们用OpenGL的工作重心是在绘制各种图形图像到FBO(Framebuffer)上。
基于GLKView的OpenGL
GLKView中就封装了EGL和UIKit的链接过程和绘制画面刷新功能,在上层只需要给它设置一个Contex就可以开始进行OpenGL绘制了。
自定义GLKView的话就在它的drawRect中编写GL代码。1
2
3
4
5
6
7
8
9
10
11
12
13- (instancetype)initWithFrame:(CGRect)frame {
if (self = [super initWithFrame:frame]) {
self.context = [[EAGLContext alloc] initWithAPI:kEAGLRenderingAPIOpenGLES2];
}
return self;
}
- (void)drawRect:(CGRect)rect {
[super drawRect:rect];
glClearColor(0.0f, 1.0f, 0.0f, 1.0f);
glClear(GL_COLOR_BUFFER_BIT | GL_DEPTH_BUFFER_BIT);
}
外部使用的话可以使用它的代理方法- (void)glkView:(GLKView *)view drawInRect:(CGRect)rect;
基于EGL的SurfaceView
在Android中EGL可以配置的地方就很多了。它的EGL由三个部分组成:Display(渲染设备,即Renderbuffer),Surface(缓存帧,即Framebuffer),Context(上下文环境)。这三部分在Android中均是可以配置的。1
2
3
4
5
6
7
8
9
10
11
12
13
14
15
16
17
18
19
20
21
22
23
24
25
26
27
28
29
30
31
32
33
34
35
36
37
38
39
40
41
42
43
44
45
46
47
48
49
50
51
52
53
54
55
56
57
58
59
60
61
62
63
64
65
66
67
68
69
70
71
72
73
74
75
76
77GLContext::GLContext(GLRenderAPI apiLevel, ANativeWindow *window) {
// EGL配置
EGLint confAttr[15] = {
EGL_RENDERABLE_TYPE, EGL_OPENGL_ES2_BIT,// very important!
EGL_SURFACE_TYPE, EGL_WINDOW_BIT, // we will create a pixelbuffer surface
EGL_RED_SIZE, 8,
EGL_GREEN_SIZE, 8,
EGL_BLUE_SIZE, 8,
EGL_ALPHA_SIZE, 8, // if you need the alpha channel
EGL_DEPTH_SIZE, 16,// if you need the depth buffer
EGL_NONE
};
// EGL Context配置
EGLint ctxAttr[3] = {
EGL_CONTEXT_CLIENT_VERSION, 2, // very important!
EGL_NONE
};
switch (apiLevel) {
case GLRenderAPIES2 :
confAttr[1] = EGL_OPENGL_ES2_BIT;
ctxAttr[1] = 2;
break;
case GLRenderAPIES3:
confAttr[1] = EGL_OPENGL_ES3_BIT_KHR;
ctxAttr[1] = 3;
break;
default:
break;
}
// 获取默认EGL显示窗口
EGLDisplay display = eglGetDisplay(EGL_DEFAULT_DISPLAY);
checkEglError("eglCreateWindowSurface");
if (display == EGL_NO_DISPLAY) {
throw "eglGetDisplay failed";
}
// 初始化EGL
EGLint eglMajVers, eglMinVers;
EGLBoolean initResult = eglInitialize(display, &eglMajVers, &eglMinVers);
assert(initResult);
// 配置EGL
EGLConfig config = NULL;
EGLint numConfigs = 0;
if (!eglChooseConfig(display, confAttr, &config, 1, &numConfigs) || numConfigs != 1) {
if (apiLevel == GLRenderAPIES3) {
confAttr[1] = EGL_OPENGL_ES2_BIT;
ctxAttr[1] = 2;
mRenderAPI = GLRenderAPIES2;
if (!eglChooseConfig(display, confAttr, &config, 1, &numConfigs) || numConfigs != 1) {
assert(false);
}
} else{
assert(false);
}
}
// 创建Surface
int surfaceAttribs[] = { EGL_NONE };
EGLSurface surface = eglCreateWindowSurface(display, config, window, surfaceAttribs);
checkEglError("eglCreateWindowSurface");
// 创建EGL Context
EGLContext context = eglCreateContext(display, config, nullptr, ctxAttr);
if (context == EGL_NO_CONTEXT) {
assert(false);
}
mWindow = window;
mSurface = surface;
mContext = context;
mDisplay = display;
mConfig = config;
}
可以看见Android中是直接为SurfaceView在创建Surface(Framebuffer)的时候将Surface和Display(Renderbuffer)联系起来。
之后在使用这个SurfaceView的OpenGL的时候需要进行上下文的切换和渲染帧刷新。1
2
3
4
5
6
7void GLContext::swapToScreen() {
eglSwapBuffers(mDisplay, mSurface);
}
void GLContext::use() {
eglMakeCurrent(mDisplay, mSurface, mSurface , mContext);
}
到这一步Android中的EGL就完成了,接下来就需要通过控制SurfaceView的周期来实现对渲染控制。
总结
这里主要是学习EGL是如何跟本地窗口系统链接的。iOS和Android的操作侧重点略有不同,iOS申请一个Contex非常简单,复杂的是链接Framebuffer到Layer上的过程,而Android申请一个Context需要填一堆参数相对繁琐一些。
从OpenGL的顶点输入到渲染缓存帧输出再到本地的窗口系统。OpenGL引擎运行在Context中,将引擎输出结果到Framebuffer中存储再输出到Renderbuffer中显示,让Renderbuffer和本地窗口系统联系在一起,那么整个流程就可以实现OpenGL的渲染了。